Monday, January 14, 2013

Elizabeth, initial survey part II

Let's step the mast.  Like most vintage era Moths, the Ventnor has a hollow mast with an internal halyard.  The heel of the mast has a "clothespin" notch which slips over a similar one in the keelson.

The standing rigging is a simple three stay configuration.  The bow stay has retained its Ventnor Boat Works-made pelican hook.  The hook has a home made "keeper" made from a copper hog ring.  The original keeper was made from copper tubing.  Both side shrouds have lost their pelican hooks.  Someone replaced them with screen door quality turnbuckles.  The turnbuckles were missing their bottom eyes.  Fortunately those eyes are the ones with right-hand threads and so I was able to come up with enough bits and pieces to kluge the rig together for the purpose of rigging the boat in my front lawn.

The stay wire is rusty, brittle 1/4" galvanized wire that is full of "meat hooks" and has long since lost its zinc coating.  I'll replace them with 1 x 19, 3/32" stainless steel braid.  Hopefully I'll be able to source a proper sized threaded eye to replace the swagged terminal.  I have a couple of period correct pelican hooks in my hardware collection for the side stays.

At the other end of the mast, the hounds are a scant 21" from the tip!  I wonder how much this mast will bend?  The mast on Bill Boyle's Ventnor has the hounds set at 28" from the tip.  Another difference between supposedly "production" boats.

Before stepping the mast, the tail of the halyard must first be fed through the deck partner.  Note the nice "streamlined" boss that protects the deck at the partner.

How does one retrieve the tail of the halyard from the far reaches under the bow deck?  Why with a "Higgins Stick" of course!


A Higgins Stick is nothing more than a coffee cup holder screwed into a piece of dowel.  Chuck Higgins, a member of the founding generation of Moth Boaters showed me this little trick before he passed away.

The mast stepped.

The sail up for perhaps the first time in many years.  Not a bad looking sail considering it's Egyptian cotton and is as old, if not older, than I am.  Two of the sewn-in battens are broken and will need replacing.  This boat was probably purchased with day sailing in mind and was probably never raced since the sail doesn't have the Circle-M class insignia.  Boats of this era often did not have numbers on the sails.  The identifying numbers were instead painted on the bow deck.

Merv Wescoat's sister worked in the sail loft at VBW.  I wonder if she stitched together this sail?

Rigged up; port side view.


Rigged up; starboard bow.


Rigged up; stern view.


I think that handy, but heavy bronze Herreshoff bow cleat will have to go.


The trigger on that little bronze hook has a bad case of arthritis.

I'll let it "rest" for a few weeks in this penetrating oil bath and see if it loosens up.


 With cold weather closing in I'll probably work on getting that red rudder to fit and then wait for spring.  Hopefully I'll get this boat back on the race course this summer.  In the meantime, I've been supplied with contact information for an elderly previous owner and hope to learn some of the boat's history.  I've been told that the boat was named after his first wife.

Sunday, January 13, 2013

Elizabeth, an initial survey.

OK, in my last post I teased you with just a look at the damaged boom from my latest acquisition.  Yesterday provided a rare warm day in January so it's time for a full reveal.  Just what's under the tarps?

A lovely Ventnor Moth ripe for restoration.

Meet Elizabeth. 


As I mentioned in the last post, some of the deck seams have opened up since I last saw this little boat a year and a half ago.


Most of the cracks and open seams appear to be in the forward portion of the deck.

However, there is this somewhat worrisome crack which extends from the starboard chain plate all the way to the bow block.  The rig feeds a lot of the load from the sail through the shroud chain plates and then throughout the hull, so a solid repair will be required.  Probably the deck will have to be removed to accomplish this.

The dagger board trunk also has a dodgy looking fiberglass repair.  The trunk will need to come out and either a new one fabricated or if possible, the original one carefully pulled apart and reassembled.

The port side of the trunk has a wooden jam cleat for the halyard.

The floor boards are a collection of original (darker wood) and replacements.

Zooming in on the center floor board.  Splits starting at a fastener hole are a common failure mode.  Note, more dodgy looking glass on top of the keel.

I poked the camera up under the bow deck for a look-see.  Cobwebs and probably part of a rat's nest first catch the eye.  Otherwise the framing and bottom ply panels look to be in good condition.  The line coming down and through the cheek block, mounted on the keelson, is for the downhaul.  Note the notch in the keelson just ahead of the cheek block.  That is the mast step.  The heel of the mast has a matching "clothes pin" shape that matches the cut out in the keelson.

Looking under the stern deck we see more cobwebs, the fasteners for the rudder bracket and one end of the traveler rod.

The dagger board is the familiar and correct Ventnor Boat Works shape.

One of the always interesting mysteries encountered when taking over a used boat is trying to figure out the purpose of odd bits of gear which convey with the boat.  I have no idea how a previous sailor of this boat used this bit of poly line with the two swivel hooks.

Ditto this bit of clothes line with a small bronze snap hook.  It's too short and too fat to be the line used to attach the foot of the sail to the boom.  The hook has a bad case of arthritis but I'll keep it anyway.

In the days before Harken and Ronstan, the best boating hardware came from the hardware store.  This "shackle" attaching the block to the traveler rod must have been sourced from the Tractor Supply Co.

But it's not all bad news in the hardware dept.  This bow chain plate is an original VBW piece.

As are the shroud chain plates,

the rudder bracket

and the traveler rod.  At some point the traveler rod got bend.  Hopefully I can cold set the rod back to more or less vertical.

However, this rudder/tiller/hiking stick are clearly home made items.  One wonders what happened to the original VBW "barndoor" rudder with its distinctive "wishbone" tiller?

Fortunately, your diarist never throws anything away.  This is an original Ventnor barn door rudder with wishbone tiller.  This was from Moth Nr 764, one of the two Ventnor Moths which I raced in the late 1950s.  Nr 764 was heavily damaged in a port/starboard incident and in those days a Ventnor Moth wasn't a collector's item, just a worn out race boat.  I stripped the hardware from the hull, sold off what I could and salted the rest away for future use.  Apparently the "future" is now.

Let's see if she fits.  The blade made it under the traveler rod, so far so good...


The top pintle fits the bracket giving the tiller the required clearance between the stern deck and the traveler,

but the lower pintle is about 1/4" too high for this bracket.  VBW must have changed their rudder bracket design at some point during production of these boats.  I have two choices; either lower the pintle or root around in my junque hardware dept. and see if I still have the rudder bracket that matches this rudder.  Maybe yes, maybe no. 
We'll see...

Originally, the main sheet was lead down from the boom to a block on the tiller, back up to the boom, down to the traveler and then to the hands of the skipper.  A common modification in the '50s was to remove the block from the rudder and mount it mid-way up the boom so that the skipper turned forward during tacks and gybes, the "modern" way rather than facing aft (and turning one's back on one's competitors) during maneuvers.  I may do that on this boat as well.

Another racer mod back in the day was to add short hiking sticks to each arm of the wishbone.  I will certainly do that.  In the next post, I'll rig the boat and hoist the sail--probably for the first time in many years.

Monday, January 7, 2013

Elizabeth comes home

Some readers may recall when I posted about a young cruising couple who had been gifted an old Ventnor Moth Boat named Elizabeth.  Over a year and a half have since past and just before Christmas I received an email asking if I'd be interested in acquiring the Moth.  The couple  had come to the conclusion that with their cruising commitments they would probably never get around to restoring and racing their Ventnor.  Amelia H. pointed out that the deck of the boat had dried out and planks had separated since I'd last seen her and that they had discovered small areas of rot.  I started racing Moth Boats back in 1959 in a Ventnor Moth very similar to this boat, so in a moment of nostalgia I made an offer and it was accepted.  After getting the boat home the holidays intervened but over the last few days I've had a bit of time to look at the boat and today's post details a repair I've made to the boom.

The Ventnor boom, like most vintage era Moth booms, does not have a groove for the bolt rope of the sail's foot.  Instead, the foot of the sail is attached by a piece of light line which runs through rings sewn to the sail and eyes screwed into the top of the single plank boom.

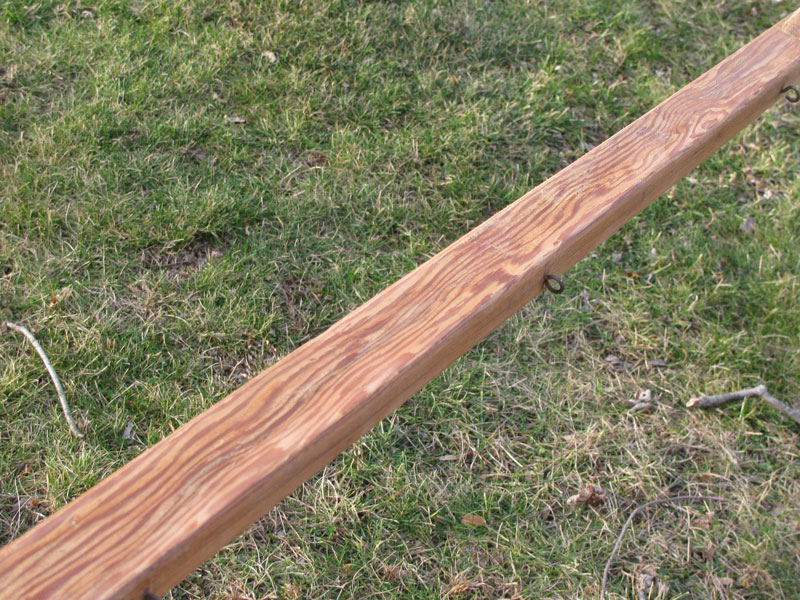
Instead of the usual gooseneck which mates a boom to the mast, one finds a pair of wood jaws.  The large eye screw is for attachment of the tack grommet of the sail.  The smaller brass eye to the right of the photo is one of nine, spaced at one foot intervals down the length of the boom for attachment of the sail's foot.  The dark color on the wood is not due to stain under varnish but the color taken on by the dead varnish itself.


Here is the same portion of the boom after I wooded it down with a card scraper.  The jaws appear to be white oak.  I'm uncertain of what type of wood the boom itself is made.  The large hook seen on the bottom side of the jaws is for attachment of a simple 2:1 downhaul.


I like using a card scraper (sometimes called a cabinet scraper) to remove old varnish.  Old varnish tends to hard and rapidly takes the tooth off sandpaper but at the same time, as the varnish heats up from the action of the sander, it quickly softens and gums up the sanding disks.  Stripping this boom would have taken at least a dozen disks.  Additionally, I would have had to listen to the sander howling away, would have had to wear a dust mask and would have had to be mindful to not create dips and hollows while removing the hard varnish from the relatively soft wood.


Of course there's a down side to using a card scraper: dead varnish quickly dulls the edges.  However it takes only a minute or two to touch up the edges.  I start the sharpening process by squaring the edges with a file.


This is followed by filing the burrs off the sides of the card.  Just a couple stokes are needed.


The final step in sharpening a card scraper is to burnish the edges at about a 5 degree angle.  You don't have to use a fancy gizmo like this.  The shank of a chisel or the stem of an exhaust valve from an automobile engine (usually can be obtained for free from a repair shop) are plenty hard enough to burnish the edge of the relatively soft scraper.  In less than 5 minutes your scraper will be sharp again.

Removing the darkened varnish revealed the wood.  I was surprised to discover that this boom was made from a plainsawn board.  All the other booms which I've seen on Ventnor-built boats have been made from quartersawn boards which exposes vertical grain.  Vertical grain is stronger and less prone to warp.  I suspect that this boom was home made to replace the original which was either broken or lost at some point.


The susceptibility of plainsawn plank to splitting can be seen by this nasty crack discovered while I wooded down the boom.

The crack seen from above.  It's deeper and more extensive that it appears in these pictures.  Note that the thin edges of a plainsawn board do expose the vertical grain.

I daubed epoxy into the crack as best I could and clamped the repair overnight.  I may shop for a suitable piece of quartersawn wood and use this boom as a pattern.  We'll see.